DES100 - Reverse Engineering
- Daniella Lim-Yip
- Mar 30, 2022
- 2 min read


BRIEF
Choose an everyday object and reverse engineer it to produce a 3D model, render, and specification drawing
I initially did rough sketches of my car phone holder from the different views, then I started to make the three different parts on 123D Design.
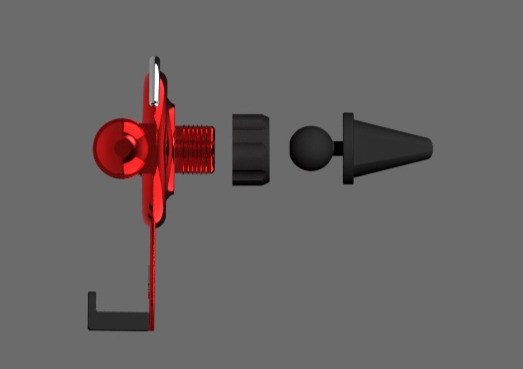
3D Model (Front/Back/Side/Top) This is the final 3D model that I did on 123D Design (not rendered).


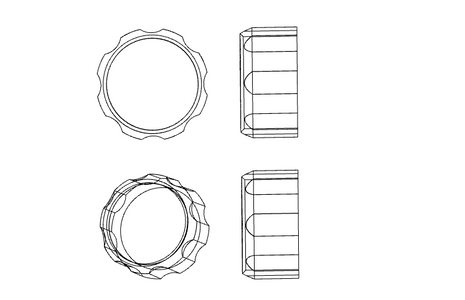
Specification Drawings
These are the my orthographic drawings for the phone holder, the universal ball with the grip, and the nut.


Render
Final rendered version of my car phone holder, using aluminium and plaster as my two materials to mimic my actual model, unable to find silicone which was used for grips on my phone holder.


REFLECTION
I did all of it on 123D Design but exported my object to Rhino 7 to do the final rendering. I initially exported it as an .stl file, but it only showed up as the sphere (picture 1), so I exported it as a different file that was the most compatible. However, that file removed the eyes on my design and added the extra curved piece (picture 2). I tried to split the object so I could remove the piece, but it didn't result in what I wanted (picture 3). Therefore I left it as the initial one (picture 2) so that the hand of the object is still seen. One thing that I found difficult was figuring out the most efficient way to create parts of my objects, like the grips, as they were very odd shapes. It was hard getting used to Rhino 7 for the final parts because the interface is extremely different to 123D Design which is more simple and straightforward, but I have picked up a few things on Rhino 7 through experimenting and researching. Overall, I'm really proud with my result and what I've done with the time that I completed it in!


Comments